Background Link to heading
I need to set up two GitLab that uses same SSO (Keycloak) and wire up with Sourcegraph to test repository permissions. This is my ops log for doing it.
Because both GitLab SAML OmniAuth Provider and Keycloak require HTTPS and I’m so used to just use Caddy to set up such thing with Let’s Encrypt, so I create one GCP VM for each GitLab and Keycloak instances and assign them with some subdomains.
For Sourcegraph, I’ll use my local instance.
NOTE: Replace any “example.com” with your own one.
Set up Keycloak Link to heading
- Create a VM using Ubuntu 20.04, machine type e2-medium (2 vCPUs, 4 GB memory), and 10 GB SSD.
- Follow the offical guide of Install Docker Engine on Ubuntu.
- Add a DNS A record to resolve a subdomain to this GCP VM, here I use
keycloak.example.com.
Bootstrap Keycloak Link to heading
Run the following command to start a Keycloak Docker container:
$ sudo docker run -d \
    -e PROXY_ADDRESS_FORWARDING=true \
    -e KEYCLOAK_USER=admin \
    -e KEYCLOAK_PASSWORD=<REDACTED> \
    -p 8080:8080 \
    --name keycloak \
    jboss/keycloak
This tells the Keycloak that it is running behind a reverse proxy (Caddy) and set up the initial admin account with given credentials.
Install and configure Caddy Link to heading
As of writing, 2.2.1 is the lastest version of Caddy.
$ wget https://github.com/caddyserver/caddy/releases/download/v2.1.1/caddy_2.1.1_linux_amd64.tar.gz
$ tar zxf caddy_2.1.1_linux_amd64.tar.gz
$ sudo mv caddy /usr/bin/caddy
$ sudo mkdir -p /etc/caddy
$ sudo vi /etc/caddy/Caddyfile
{
    http_port 80
    https_port 443
}

keycloak.example.com {
    reverse_proxy * localhost:8080
}

$ screen -S caddy
$ sudo caddy run --environ --config /etc/caddy/Caddyfile
Configure Keycloak Link to heading
Visit https://keycloak.example.com and login with the admin account, then create a test user “alice”:
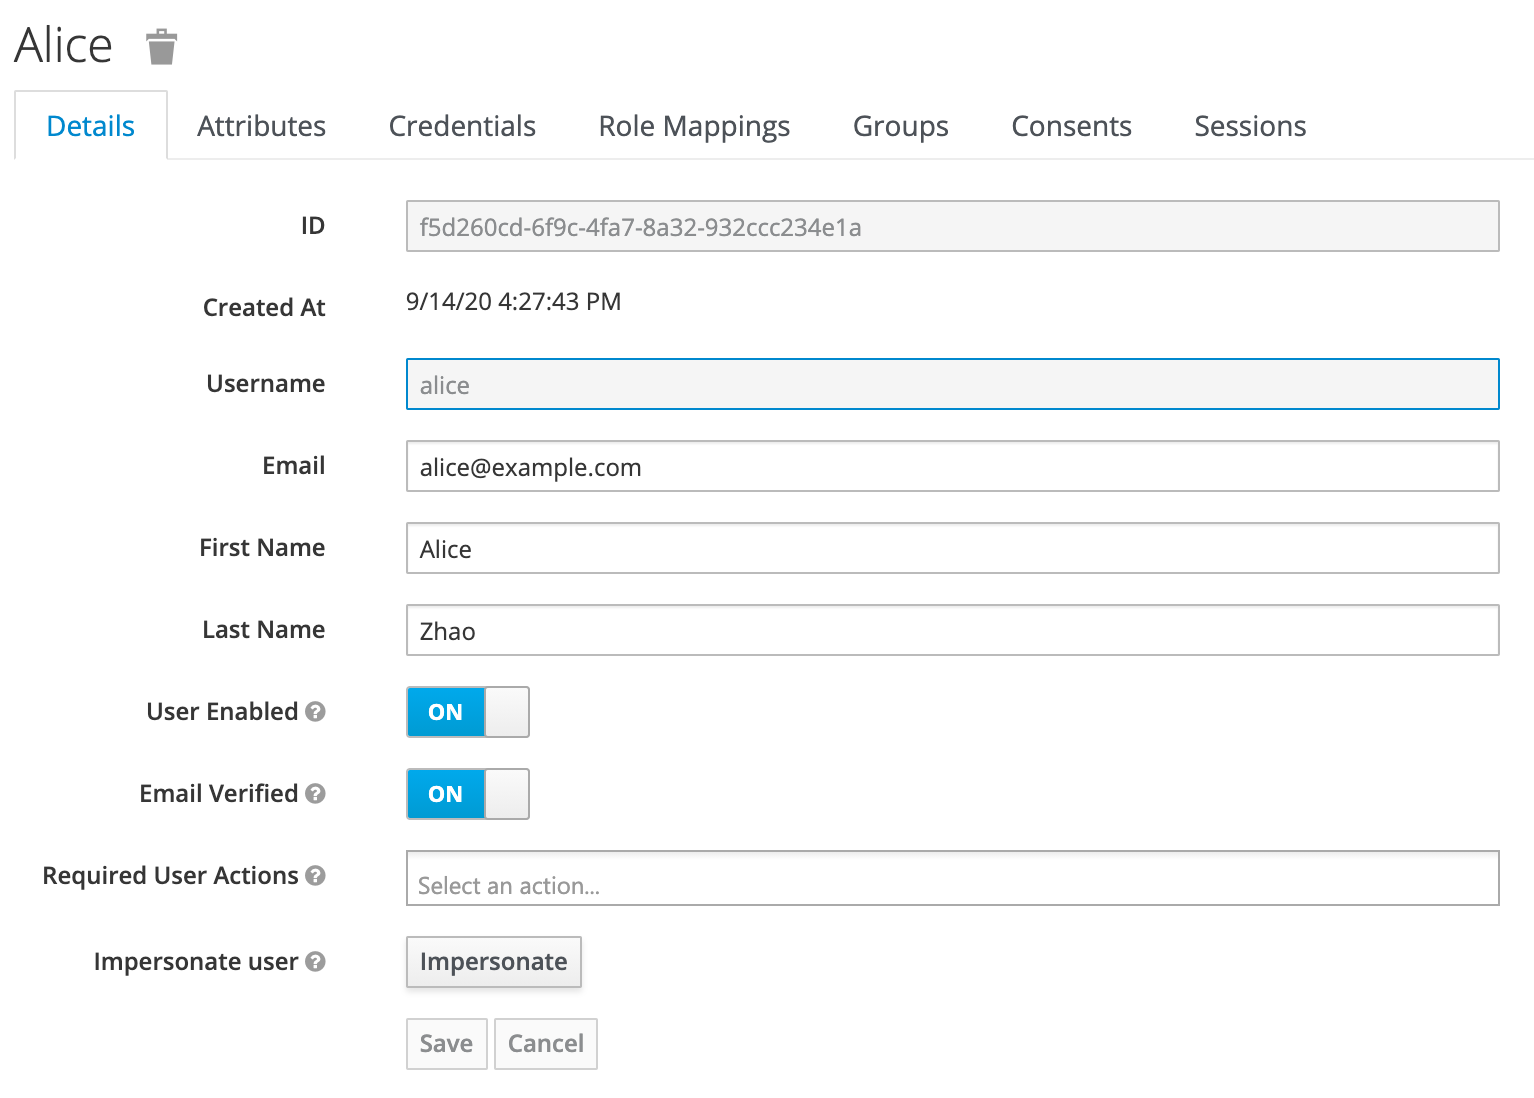
Don’t forget to set the initial password for the account.
Compute SAML X.509 certificate fingerprint Link to heading
GitLab SAML uses X.509 certificate fingerprint to avoid admin entering the long and verbose body, but it actually adds more work when I try to figure out how to generate one for Keycloak.
First, click on the SAML endpoint and get the XML:
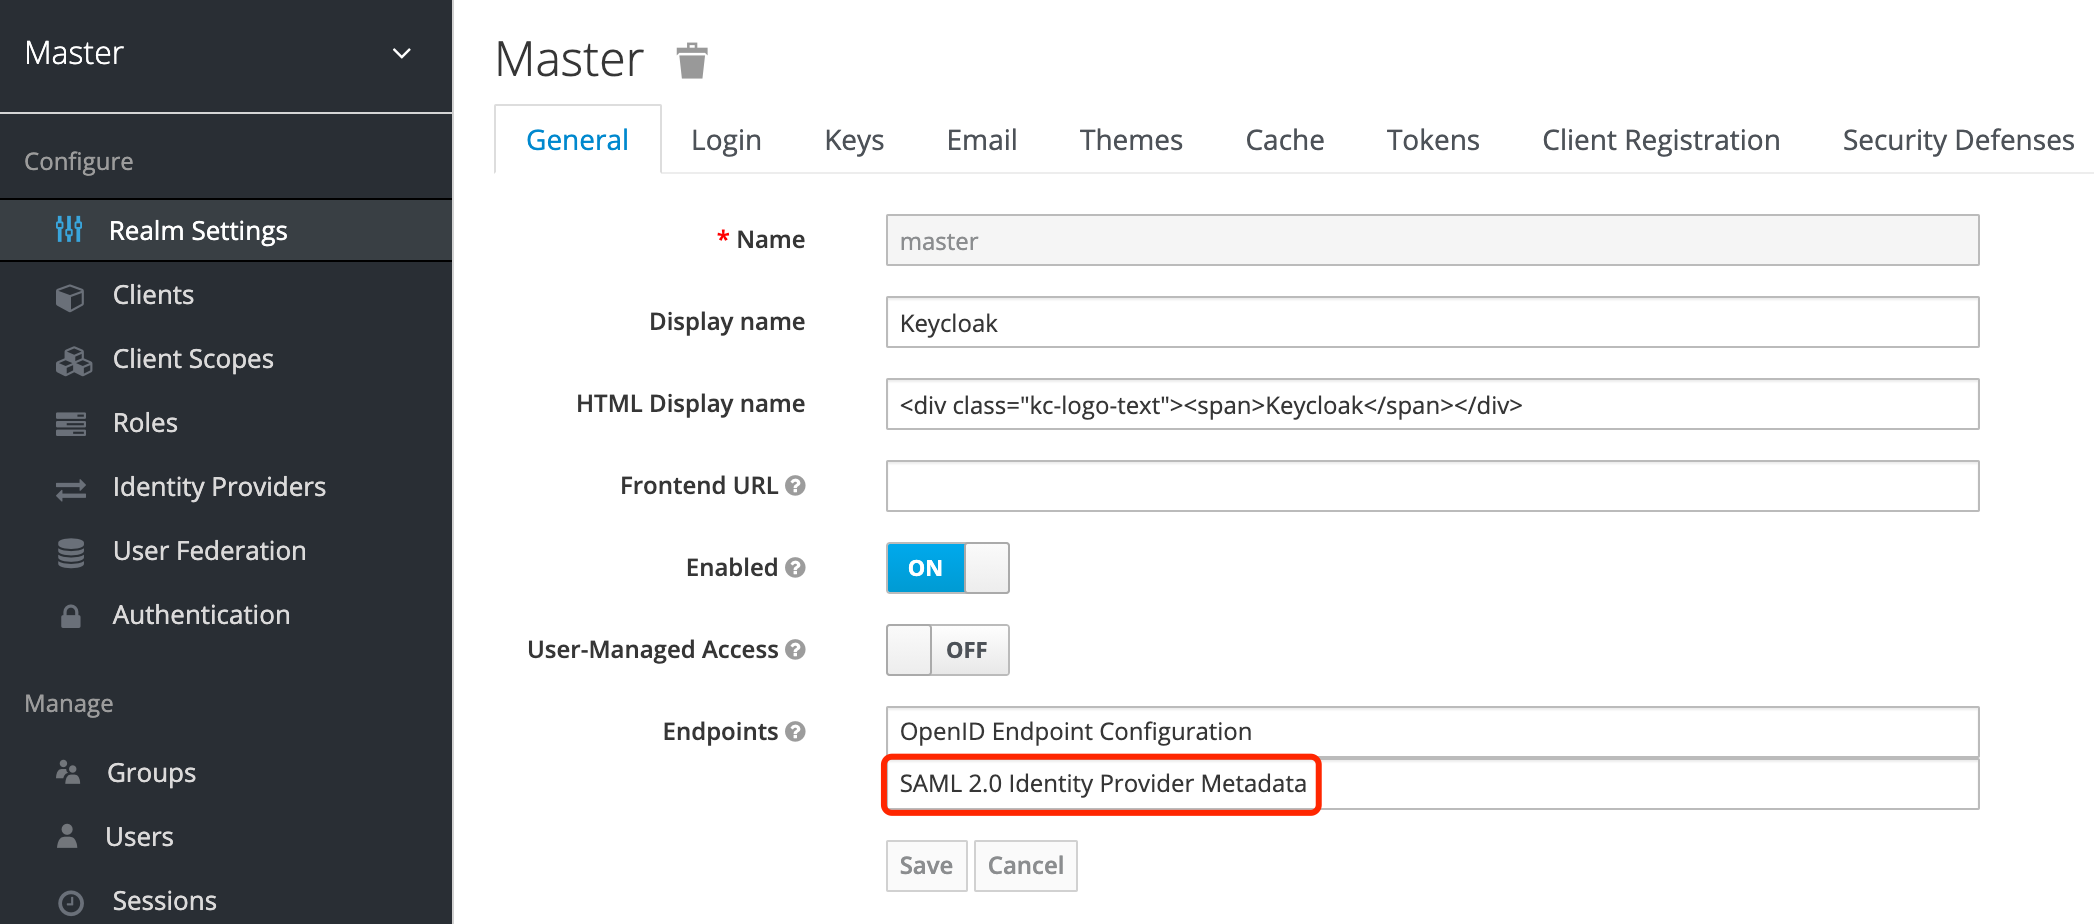
In the XML, you will find something like <ds:X509Certificate>MIICmz...</ds:X509Certificate>, and take the value of it, i.e. the part MIICmz....
Then format this X.509 certificate using X.509 Certificate Format Online Tool, which effectively adds -----BEGIN CERTIFICATE----- and -----END CERTIFICATE----- as the first and the last line.
Now calculate this formatted X.509 certificate using SAML X.509 Certificate Fingerprint, make sure you’re using SHA1 as the algorithm.
Save the fingerprint for later.
Set up the first GitLab Link to heading
- Create a VM using Ubuntu 20.04, machine type e2-medium (2 vCPUs, 4 GB memory), and 10 GB SSD.
- Follow the offical guide of Install Docker Engine on Ubuntu.
- Add a DNS A record to resolve a subdomain to this GCP VM, here I use
gitlab-1.example.com.
Bootstrap GitLab Link to heading
Set up the volumes location:
$ export GITLAB_HOME=/srv/gitlab
Run the following command to start a GitLab Docker container:
$ sudo docker run --detach \
    --hostname gitlab-1.example.com \
    --publish 8080:80 \
    --name gitlab \
    --restart always \
    --volume $GITLAB_HOME/config:/etc/gitlab \
    --volume $GITLAB_HOME/logs:/var/log/gitlab \
    --volume $GITLAB_HOME/data:/var/opt/gitlab \
    gitlab/gitlab-ee:latest
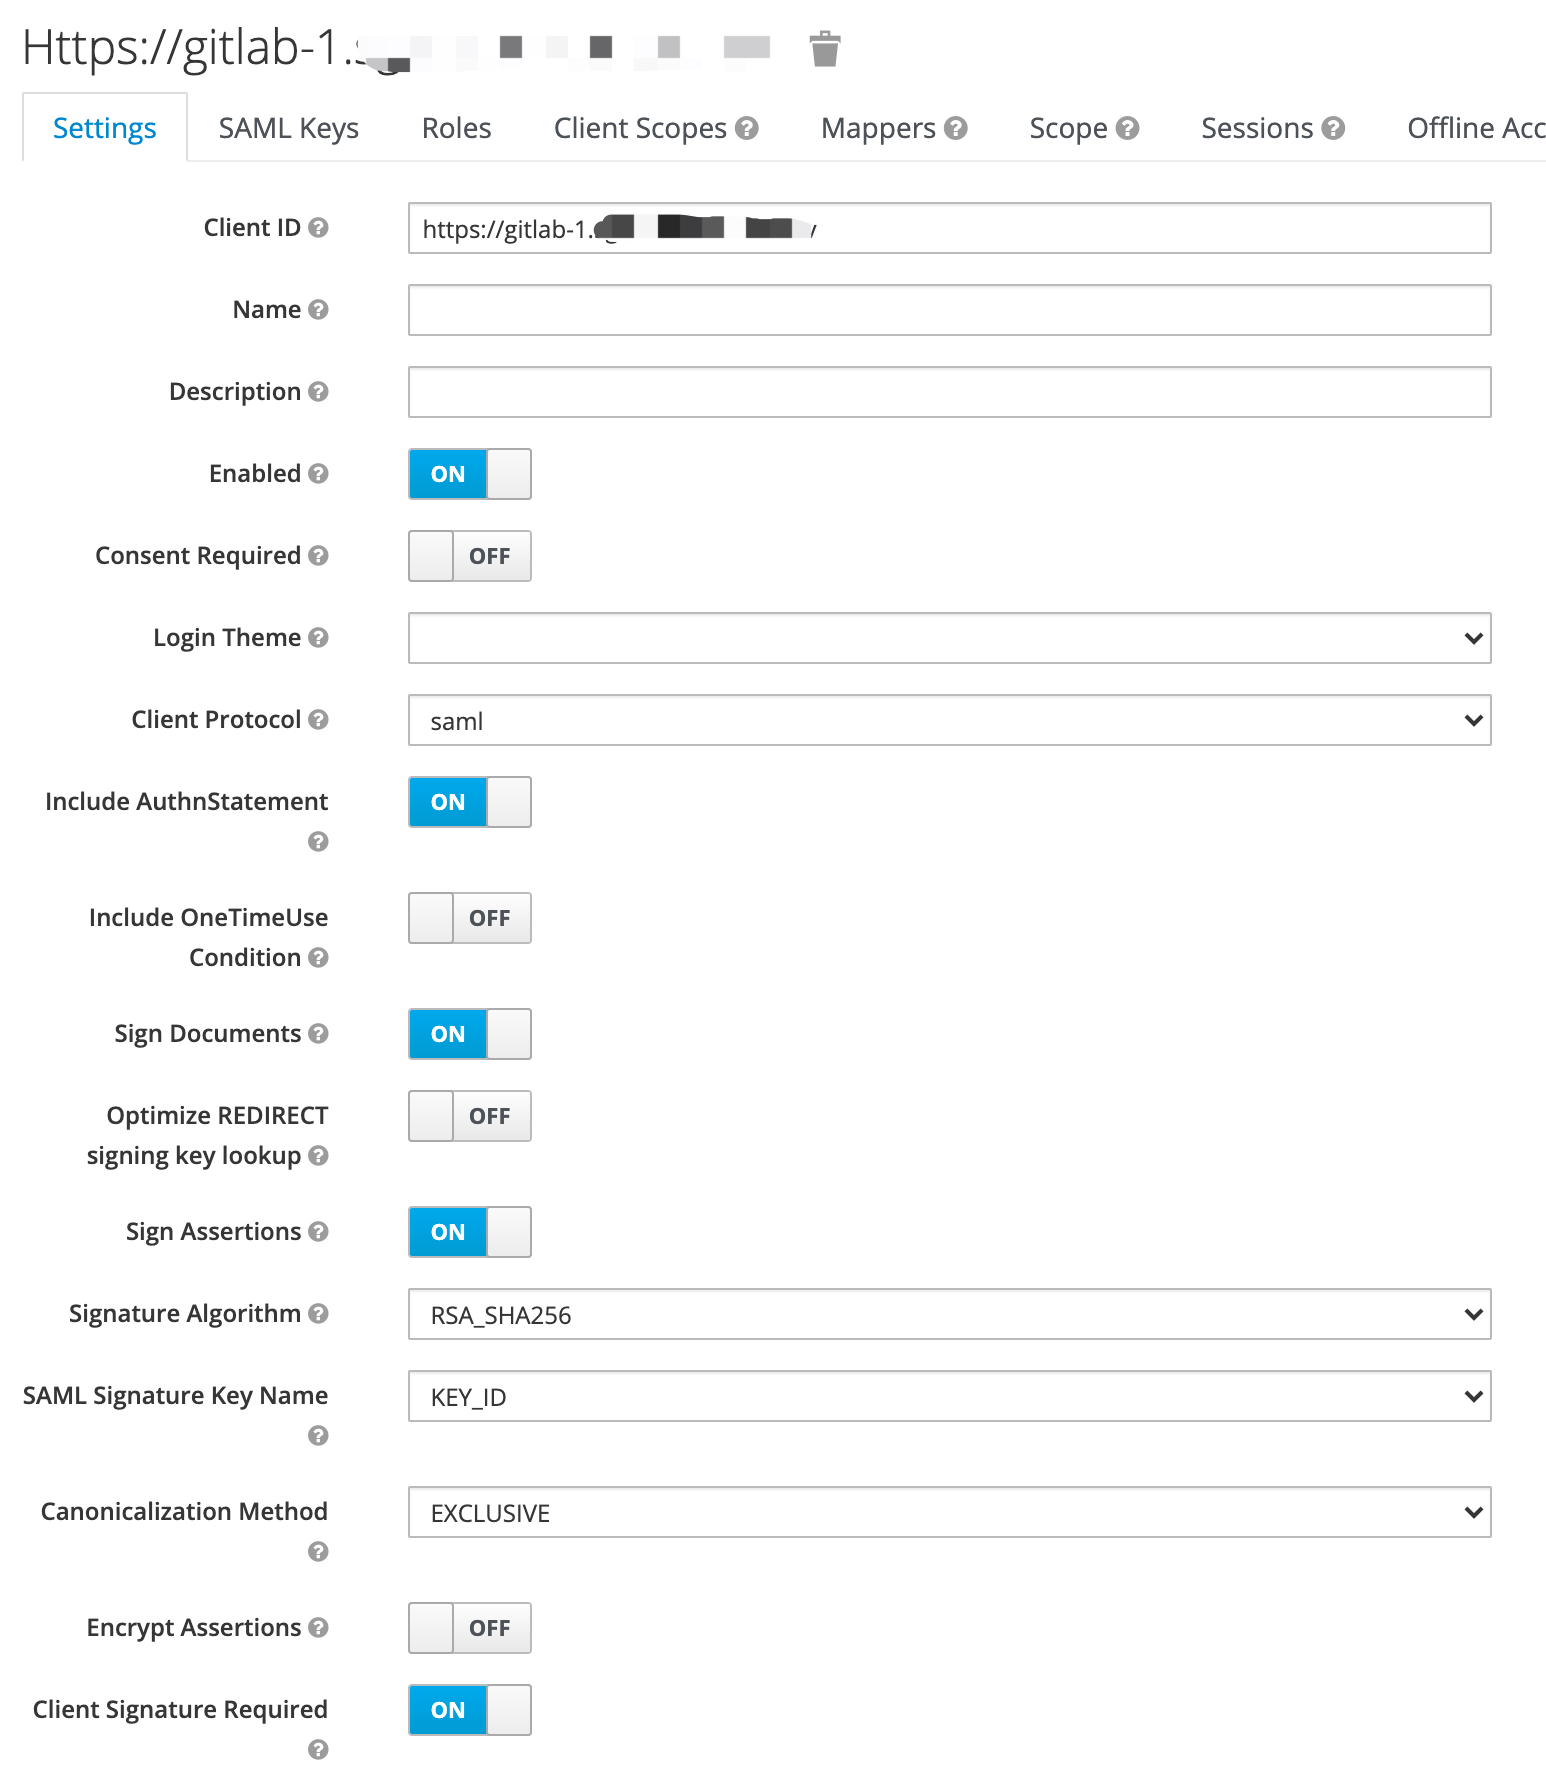
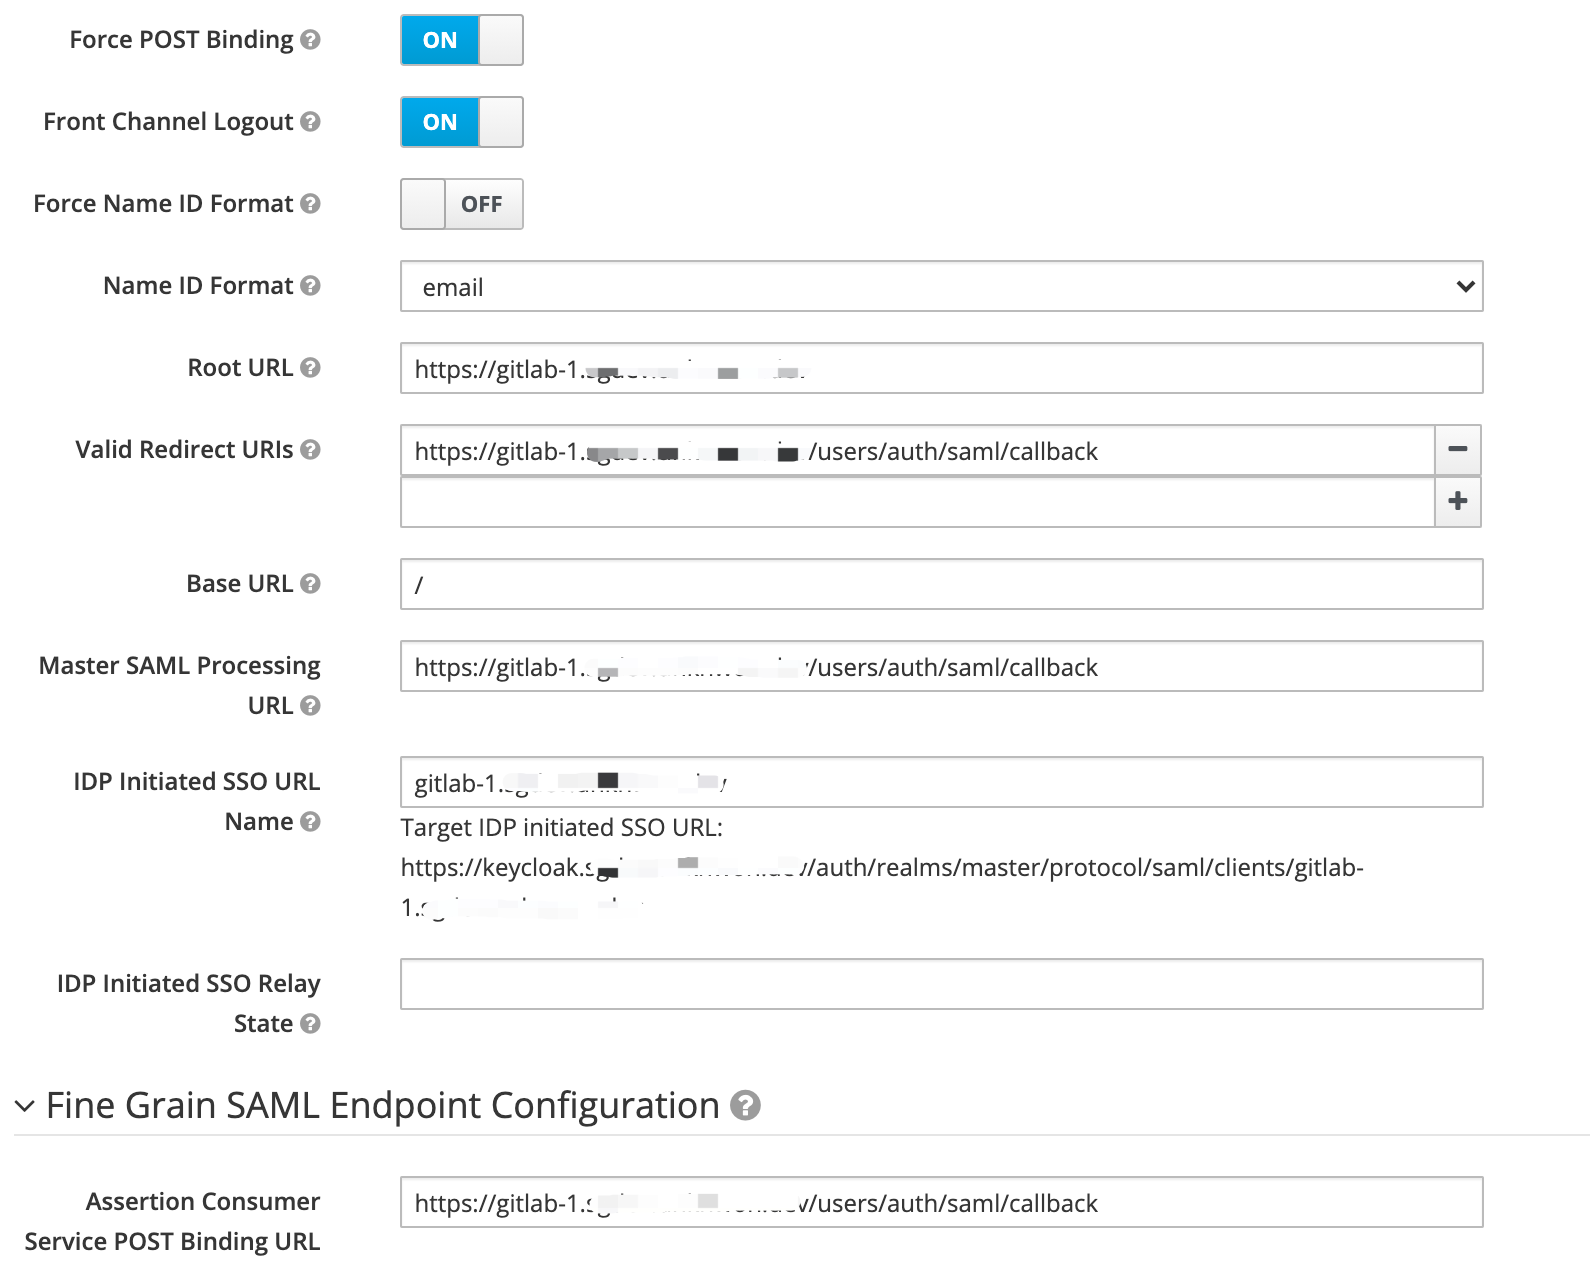
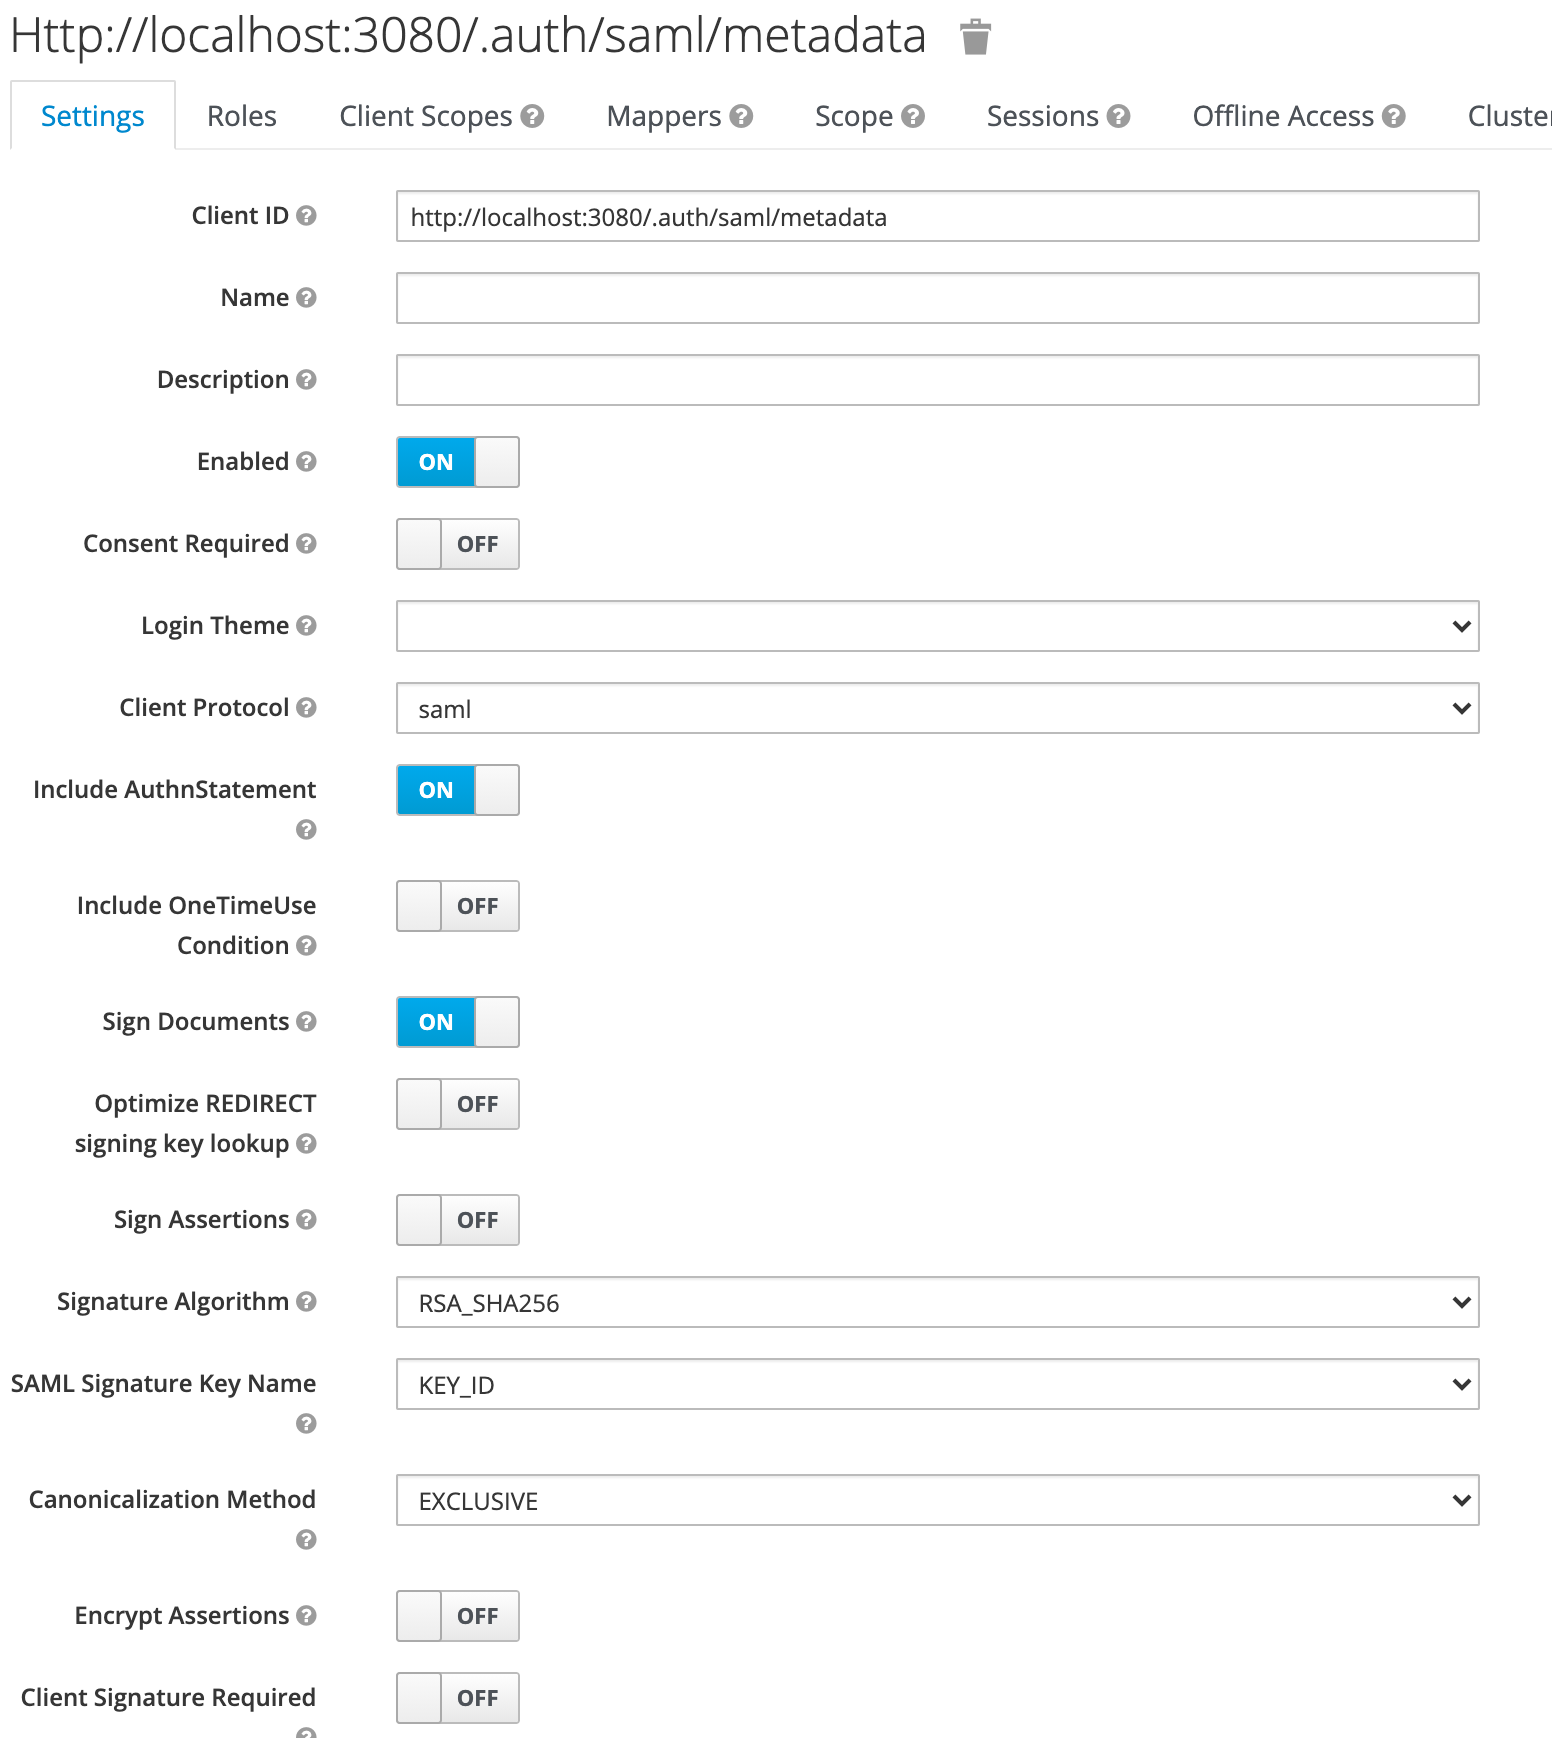
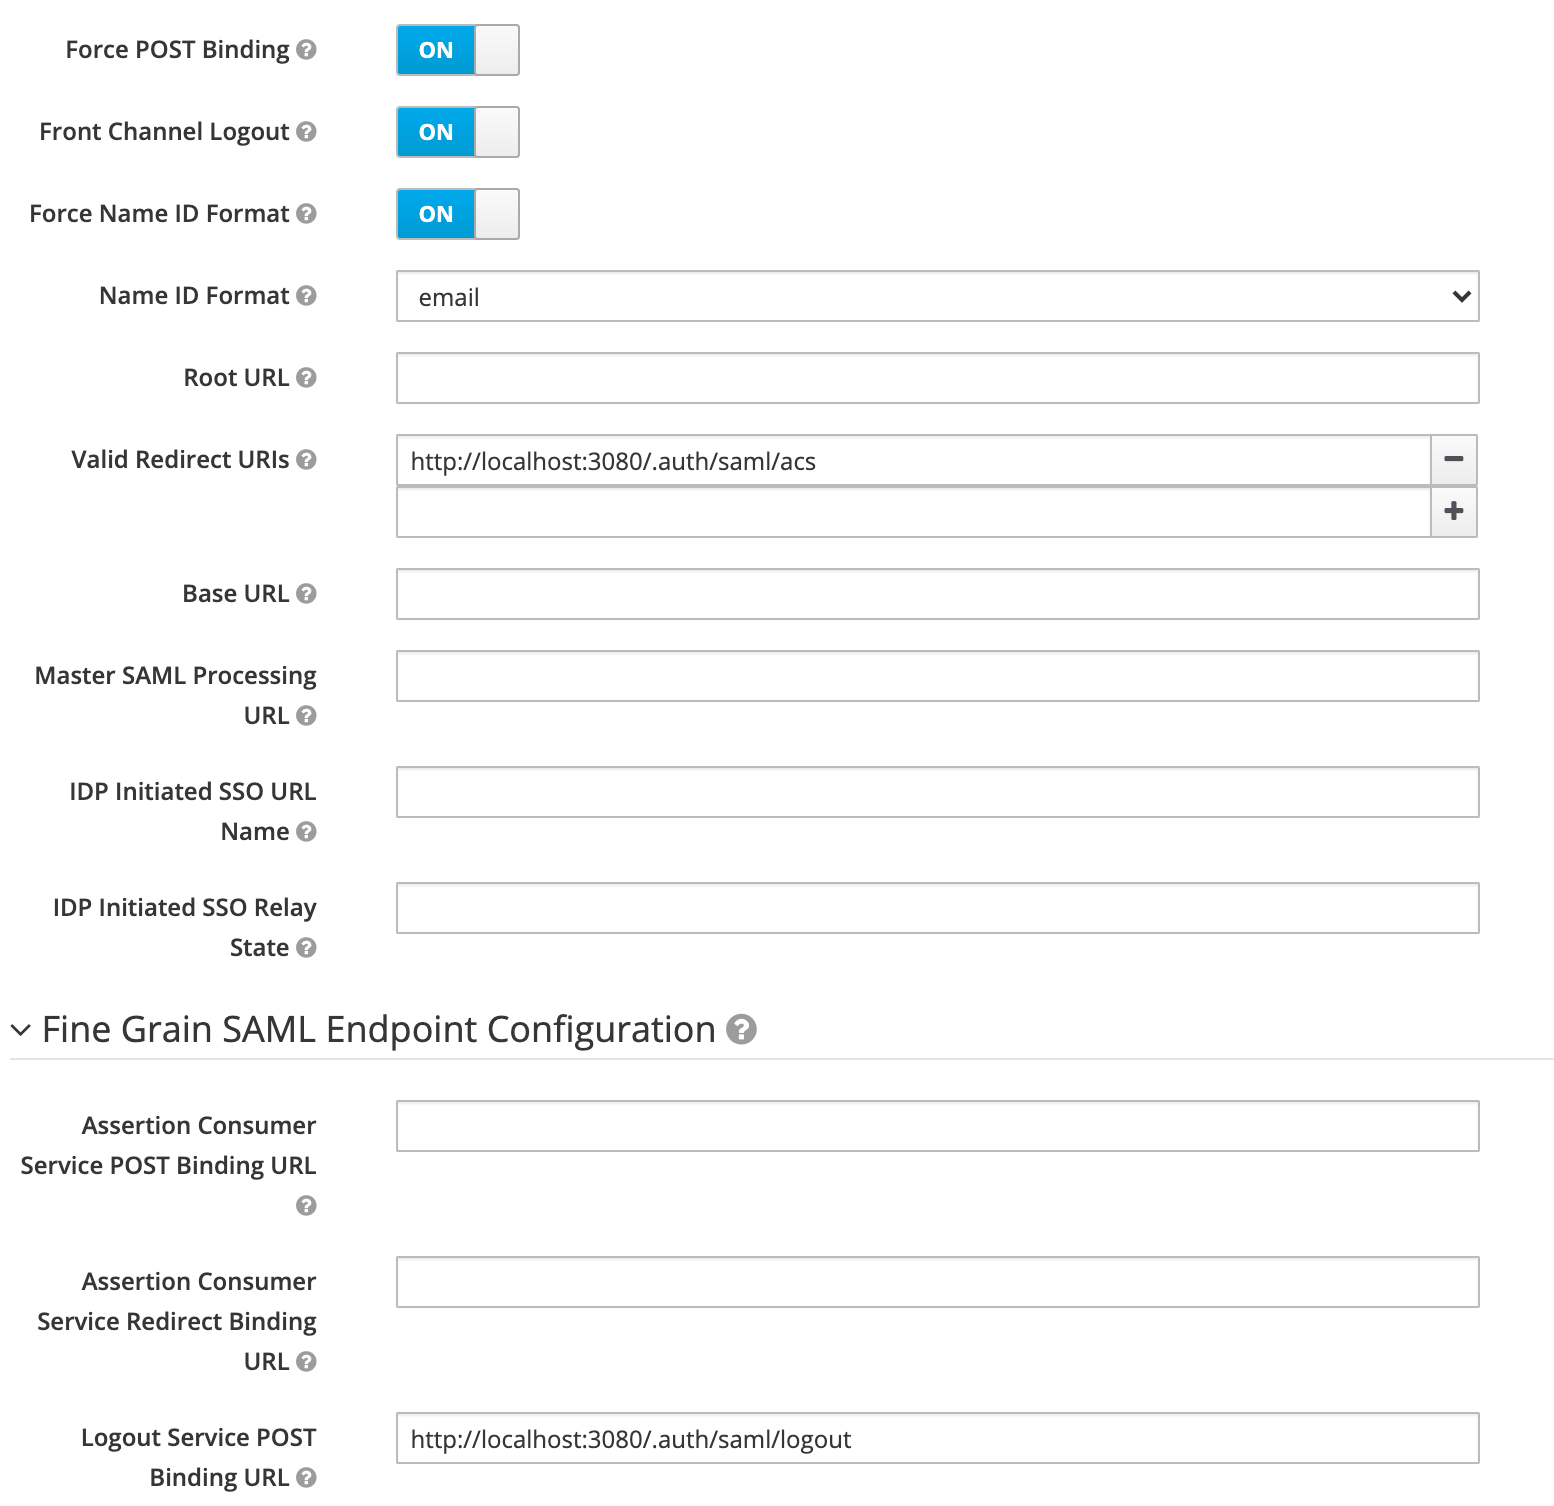
Create a Keycloak client Link to heading
Settings:
Mappers:
- Name:
name- Mapper Type:
User Property - Property:
Username - Friendly Name:
Username - SAML Attribute Name:
name - SAML Attribute NameFormat:
Basic
- Mapper Type:
- Name:
email- Mapper Type:
User Property - Property:
Email - Friendly Name:
Email - SAML Attribute Name:
email - SAML Attribute NameFormat:
Basic
- Mapper Type:
Configure SAML OmniAuth Provider Link to heading
Edit the configuration file and update “OmniAuth Settings”:
$ sudo vi $GITLAB_HOME/config/gitlab.rb
### OmniAuth Settings
###! Docs: https://docs.gitlab.com/ee/integration/omniauth.html
# gitlab_rails['omniauth_enabled'] = nil
gitlab_rails['omniauth_allow_single_sign_on'] = ['saml']
gitlab_rails['omniauth_sync_email_from_provider'] = 'saml'
gitlab_rails['omniauth_sync_profile_from_provider'] = ['saml']
gitlab_rails['omniauth_sync_profile_attributes'] = ['email']
# gitlab_rails['omniauth_auto_sign_in_with_provider'] = 'saml'
gitlab_rails['omniauth_block_auto_created_users'] = false
# gitlab_rails['omniauth_auto_link_ldap_user'] = false
gitlab_rails['omniauth_auto_link_saml_user'] = true
gitlab_rails['omniauth_providers'] = [
  {
    name: 'saml',
    args: {
        assertion_consumer_service_url: 'https://gitlab-1.example.com/users/auth/saml/callback',
        idp_cert_fingerprint: '<REDACTED>',
        idp_sso_target_url: 'https://keycloak.example.com/auth/realms/master/protocol/saml/clients/gitlab-1.example.com',
        issuer: 'https://gitlab-1.example.com',
        name_identifier_format: 'urn:oasis:names:tc:SAML:2.0:nameid-format:persistent'
    },
  }
]
NOTE: The value of idp_cert_fingerprint is the X.509 certificate fingerprint we calculated from Keycloak section.
Restart the GitLab container:
$ sudo docker restart gitlab
It takes painfully long to wait for GitLab to come up and able to serve user requests.
Install and configure Caddy Link to heading
All the same as for Keycloak except:
...

gitlab-1.example.com {
    reverse_proxy * localhost:8080
}

...
Set up the second GitLab Link to heading
All the same for the first GitLab except this time using gitlab-2.
Set up Sourcegraph Link to heading
Create a Keycloak client Link to heading
Because I’m using a local Sourcegraph instance, so the URL is pointing to localhost:
Configure SAML auth provider Link to heading
In Site admin > Site configuration, add following field:
...
  "auth.providers": [
    ...
    {
      "type": "saml",
      "configID": "keycloak",
      "identityProviderMetadataURL": "https://keycloak.example.com/auth/realms/master/protocol/saml/descriptor"
    }
  ]
...
Add repositories from two GitLab Link to heading
There are many ways to add repositories from GitLab to Sourcegraph, here I choose to use Sudo access token.
Add code host connection for the first GitLab:
{
  "url": "https://gitlab-1.example.com",
  "token": "<REDACTED>",
  "projectQuery": [
    "projects?membership=true&archived=no"
  ],
  "authorization": {
    "identityProvider": {
      "type": "external",
      "authProviderID": "keycloak",
      "authProviderType": "saml",
      "gitlabProvider": "saml"
    }
  }
}
Add code host connection for the second GitLab:
{
  "url": "https://gitlab-2.example.com",
  "token": "<REDACTED>",
  "projectQuery": [
    "projects?membership=true&archived=no"
  ],
  "authorization": {
    "identityProvider": {
      "type": "external",
      "authProviderID": "keycloak",
      "authProviderType": "saml",
      "gitlabProvider": "saml"
    }
  }
}